on
Jetson Orin Nano - Getting Started
Setting up Jetson was easy. Untill it wasn’t
Edit 12.01.2026 There was an update for SDK Manager Windows version, and now you can directyly flash the Jetson from windows device. Rest of the blog is still useful, but you don’t need to download and create a virtual machine. Also the Nvidia’s documentation on setting up the Jetson was “refreshed” and in my opinion for the worse. You still can see the original instructions in the archive
Before getting started
You can follow the official Jetson Orin Nano Developer Kit Getting Started Guide, or this post in which you can find some of my recommendations and troubleshooting. Having that in mind, if you have any problems with the steps I provided, consult the official documentation.
Before I start, I highly encourage you to set up your Jetson with an NVMe SSD (256 GB minimum). This will not only allow you to have more storage, but it is also recommended for better performance.
You need to start by updating the factory firmware to a newer version. This has to be done by flashing the hardware directly. I recommend doing it with SDK Manager. To get started, you need a machine running Linux, and to be more specific, Ubuntu 22.04. The easiest method is to install it on a virtual machine.
- Install VMware Workstation or another free VM tool like Oracle VirtualBox
- Download Ubuntu 22.04 Image
- Create a new VM with the downloaded image
There is also a Windows SDK Manager, but to my knowledge, it cannot flash the needed firmware (I also wasn’t able to connect the Jetson to my laptop).
Be sure to edit the VM settings by setting a large disk size. The first time I tried, I went with 60GB and it was not enough. (Now when I check the VM size it is 18GB?) Around 80GB worked for me — we need to download the whole SDK on the system to then flash it to the board. Also, SDK Manager is picky with the RAM and it needs at least 8GB.
After finalizing the Ubuntu install, you can start downloading the flashing app. Just follow these instructions. You are unfortunately forced to create an NVIDIA developer account just to log in to the app.
Flashing stage
A very important note is that when you attach a USB device on your VM, there is a pop-up that asks if you would like to connect the device to Host or VM. Every time this happens, select “Connect to a virtual machine” and then “OK”.
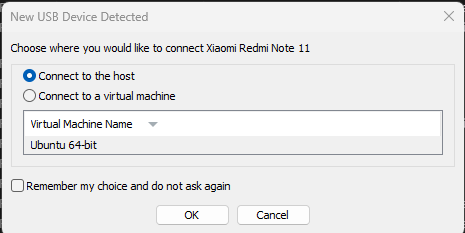
You can select “Remember my choice,” but it won’t change much. The device, in the process of flashing, will change its name so the VM will be confused and the pop-up will come back. This is not a problem in the beginning, but at the late flashing stage (about 90% done) you have to monitor the process and see if the pop-up appears. When left unattended for too long (3–5 min), it will cause an error and break the flashing process (ask me how I know). In that case, just rerun the flashing stage. It is easiest to turn up the volume of the host and listen to the device disconnect sound. When flashing is complete, remove the shorting cable, connect the screen, keyboard, and mouse, disconnect and reconnect the power cable, and boot up!
Getting started
Start with updating the system packages to the newest version. Just open the terminal and run
sudo apt-get update
sudo apt-get upgrade
You can follow up with installing a browser if you haven’t done that in the system finalizing step.
sudo apt-get install firefox
But if you try to launch it through the terminal, you will be greeted with an error:
WARNING: cannot create user data directory: failed to verify SELinux context of /home/m1/snap: cannot locate "matchpathcon" executable
cannot set capabilities: Operation not permitted
To fix this problem, execute these commands:
snap download snapd --revision=24724
sudo snap ack snapd_24724.assert
sudo snap install snapd_24724.snap
sudo snap refresh --hold snapd
This will downgrade (and stop updates of) the problematic snapd package version. You can read the full article here.
Docker setup
If you don’t need (or don’t know what is) Docker, you can skip this part. You can see full instructions here, but if you installed your system on an SSD (like me), you can skip a lot of steps. Start by updating all the packages (if you haven’t done that already):
sudo apt update
sudo apt upgrade
Follow up with installing Docker with their sketchy shell script (not even any checksums here, just hopes and prayers)
sudo apt install -y nvidia-container curl
curl https://get.docker.com | sh && sudo systemctl --now enable docker
sudo nvidia-ctk runtime configure --runtime=docker
Create a new group to avoid using sudo all the time:
sudo groupadd docker # If it does not exist
sudo usermod -aG docker $USER
Then, to check if your user was added without problems, search for the docker entry in the list:
groups $USER
Edit the /etc/docker/daemon.json file to look like this:
{
    "runtimes": {
        "nvidia": {
            "path": "nvidia-container-runtime",
            "runtimeArgs": []
        }
    },
    "default-runtime": "nvidia"
}
(or use a one-liner from the full instructions)
Lastly, reset Docker:
sudo systemctl daemon-reload && sudo systemctl restart docker
If you want to know how to run LLM’s on the Jetson read my guide here!